

WeChat Work AI Bot Integration Guide
Through the /remote-control command, you can quickly integrate CodeBuddy Code with WeChat Work AI Bot, enabling remote message-driven functionality. Using WebSocket long polling active connection mode, no public IP is required, making configuration the simplest option.
Prerequisites
- Registered WeChat Work account
- CodeBuddy Code installed:
codebuddy --version - Completed login authentication: After running
codebuddy, execute/login
1. Create a WeChat Work AI Bot
1.1 Open the Creation Page
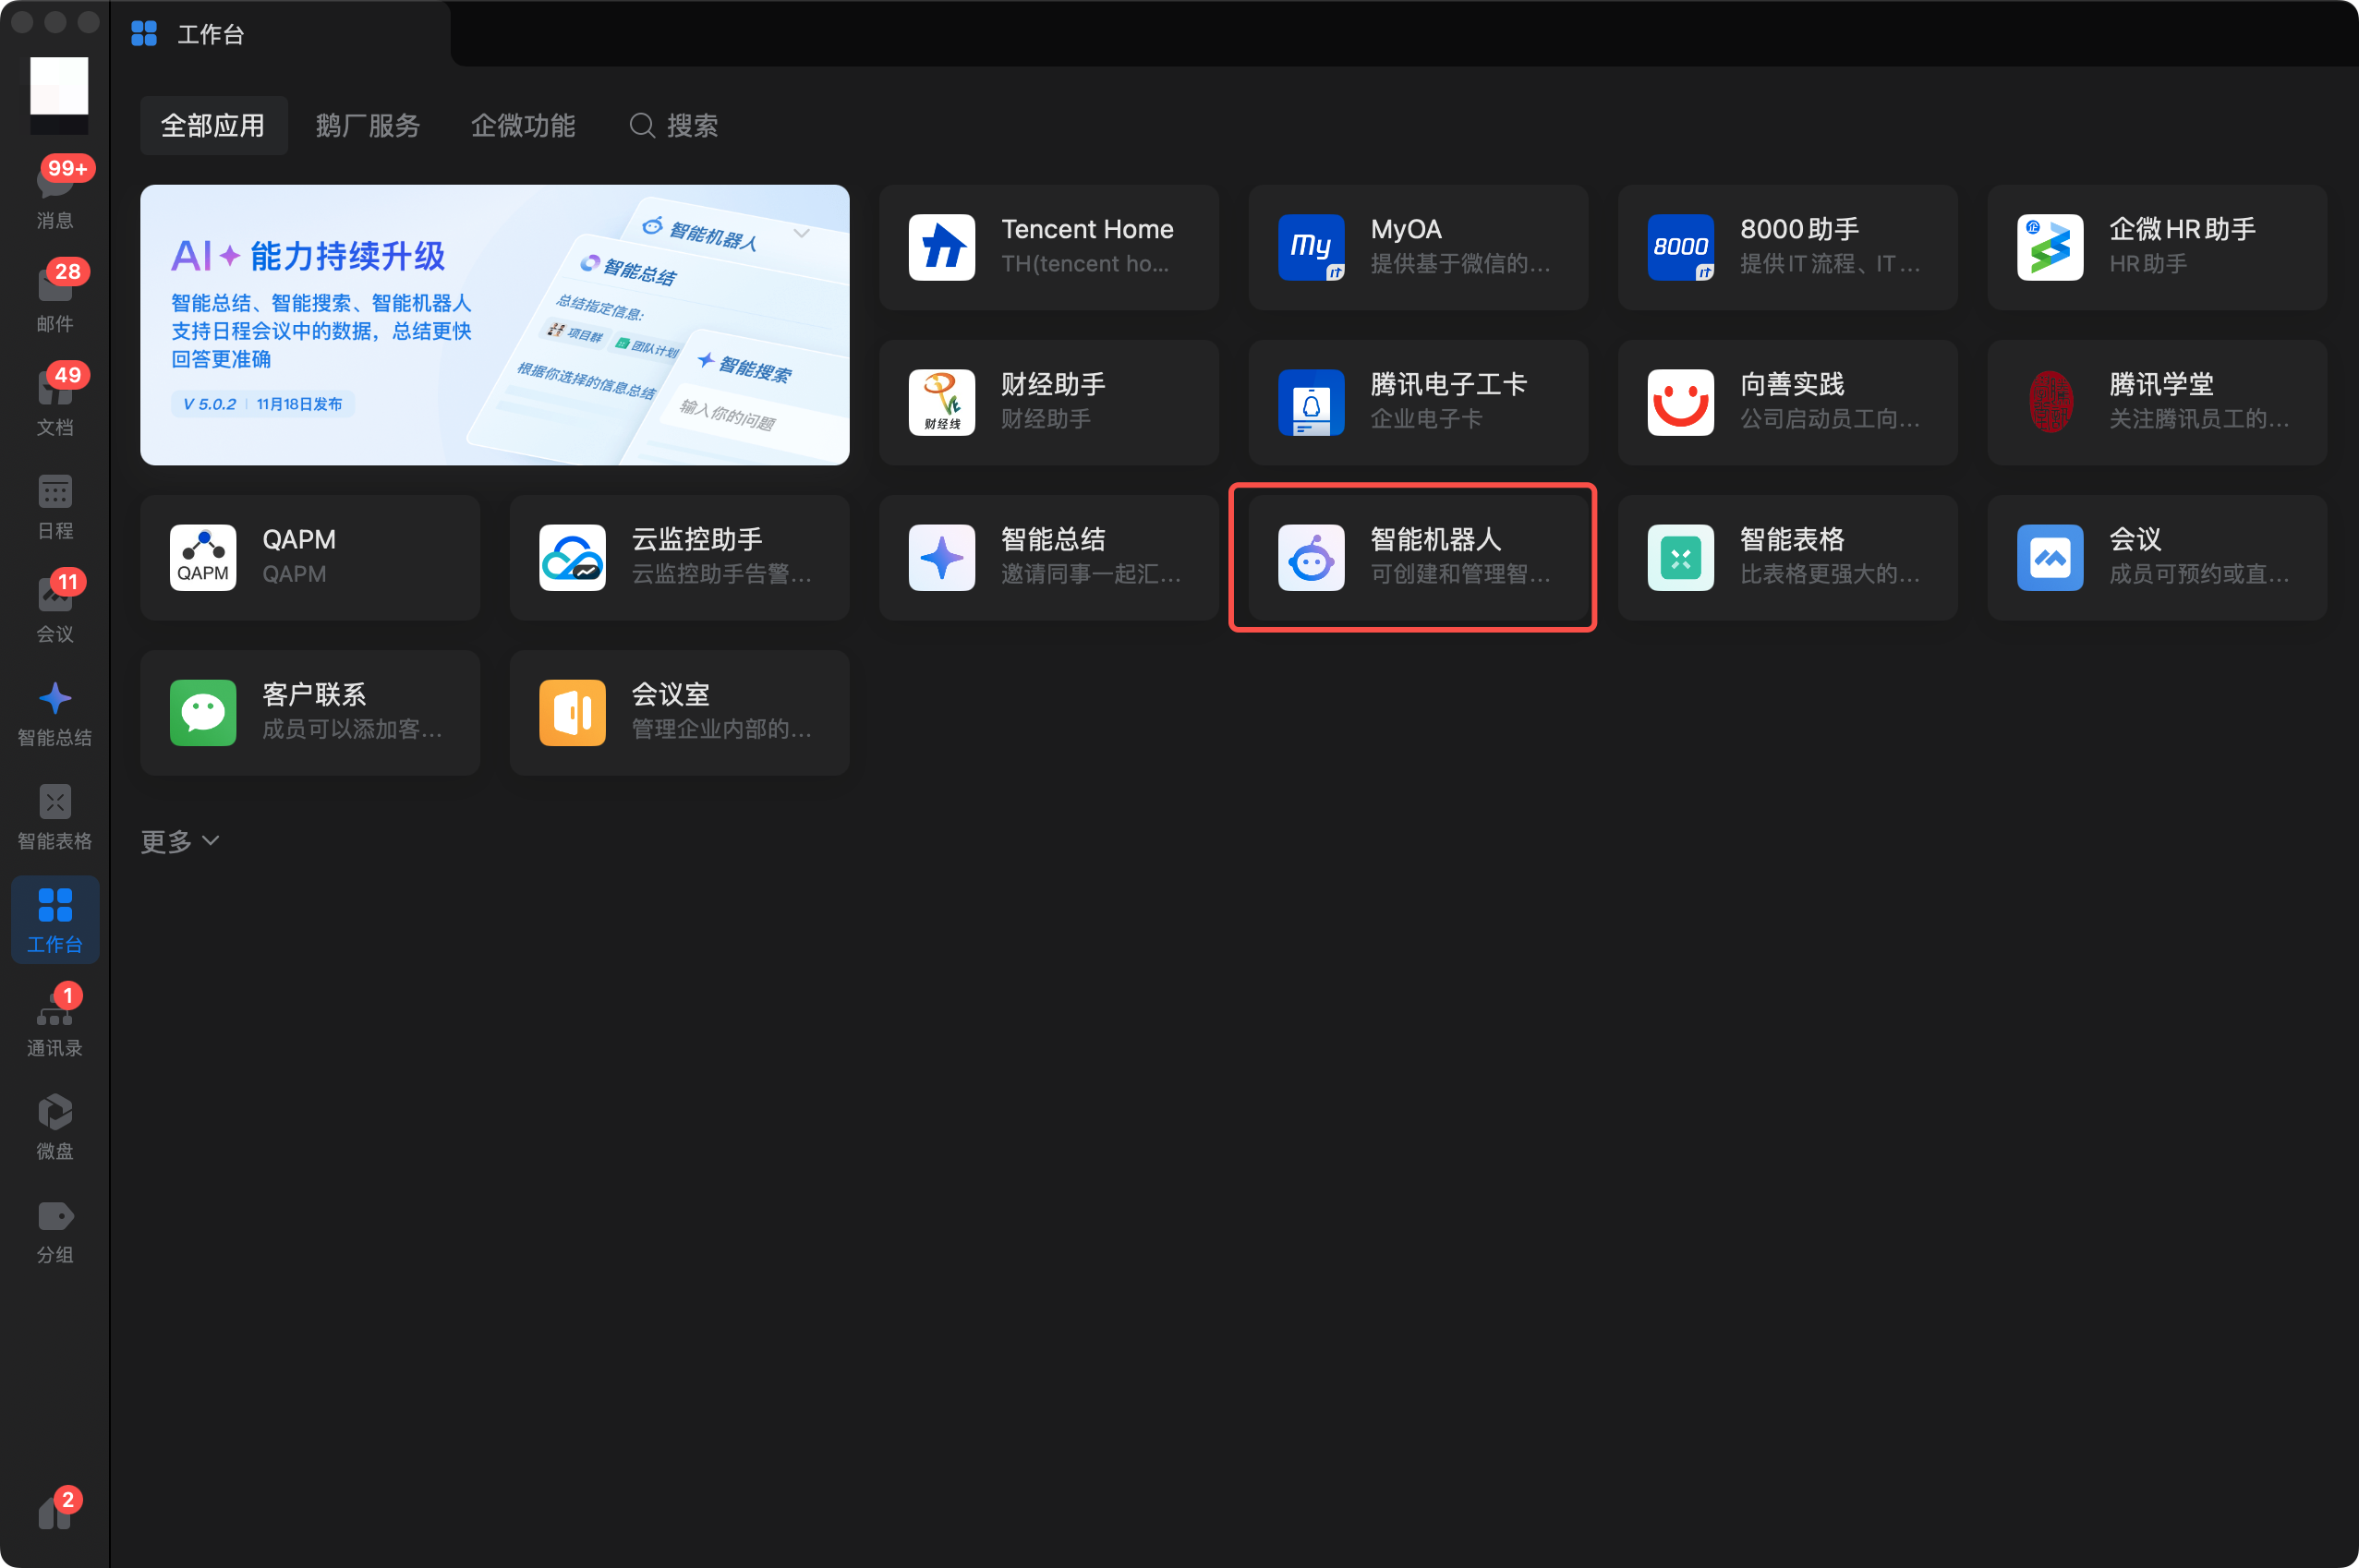
- Open the WeChat Work client and go to "Workbench"
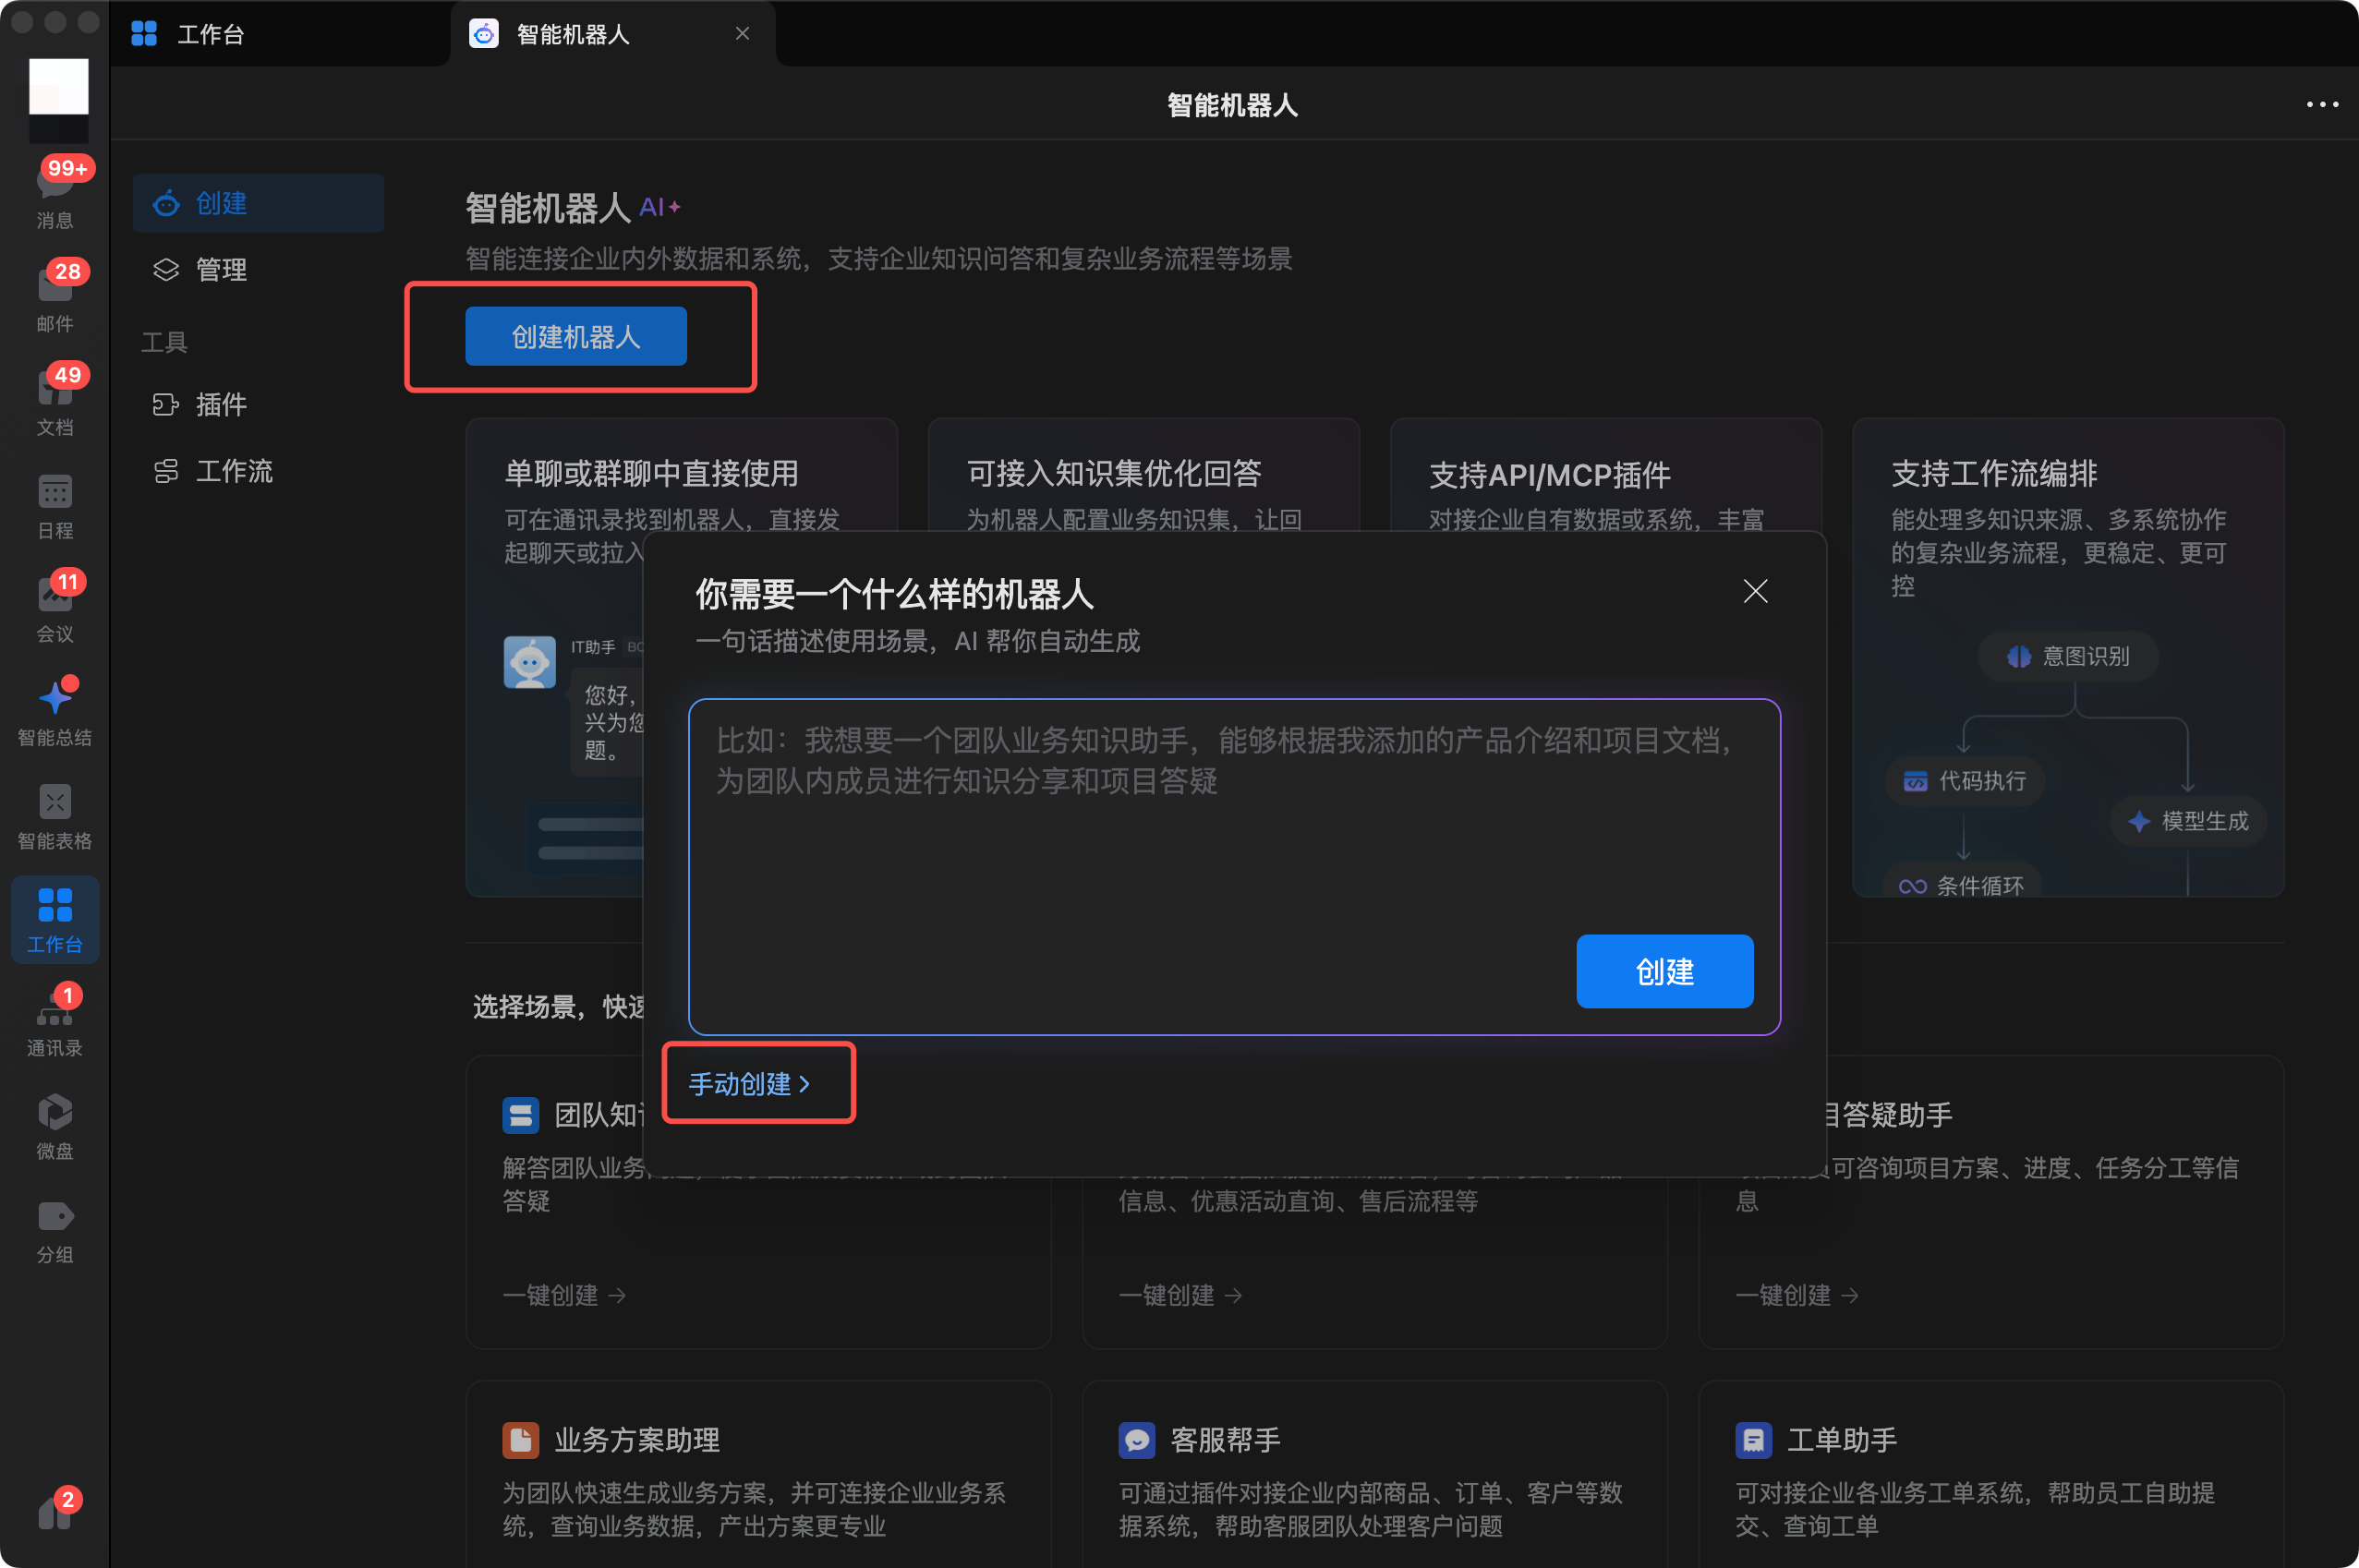
- Click "AI Bot" → Click "Create" → Select "Manual Creation"
If you cannot find the "AI Bot" entry in the Workbench, please update WeChat Work to the latest version.
1.2 Fill in Basic Information
Enter basic information such as the Bot name, avatar, and app description.
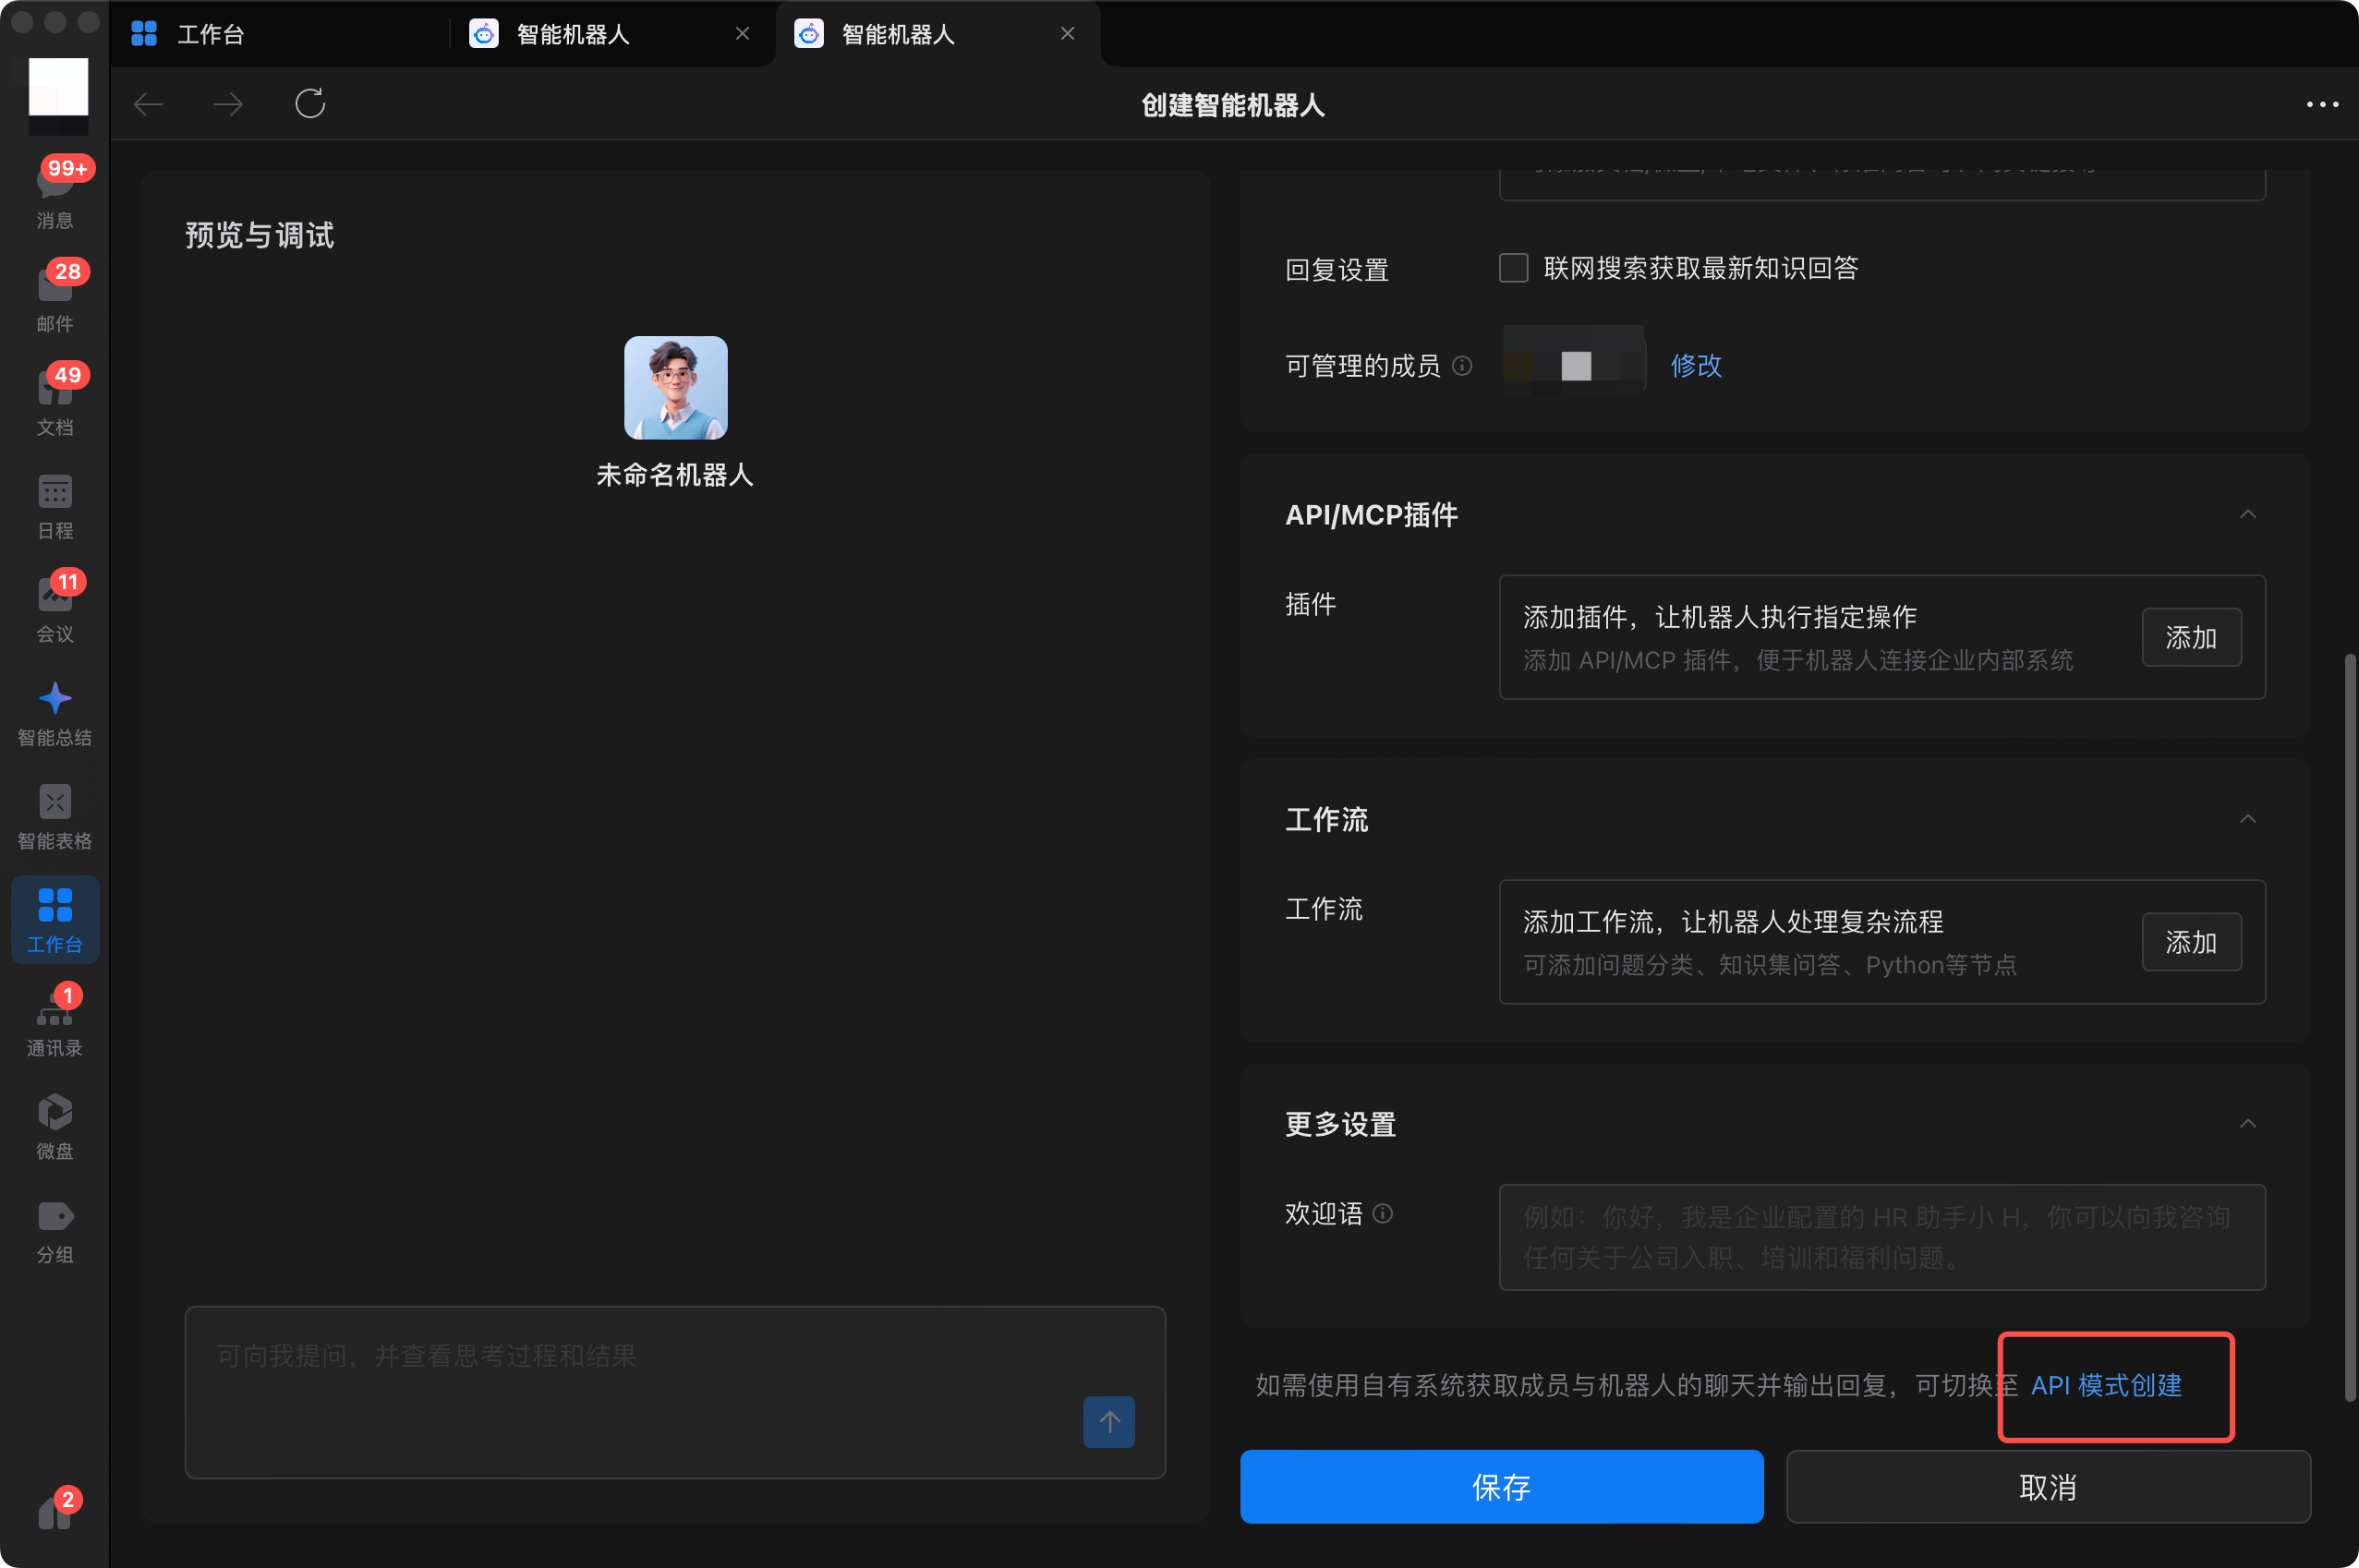
1.3 Switch to API Mode
Click "API Mode Creation" at the bottom of the page.
1.4 Select Long Polling Mode
On the API mode creation page, find the "API Configuration" area and select "Use Long Polling" for the connection mode.
1.5 Get Bot ID and Secret
Find the following information in the "API Configuration" area and keep it safe:
- Bot ID: The unique identifier for the Bot (example:
aibVGv7I...) - Secret: Click "Get" or "Click to Get" to obtain the access key
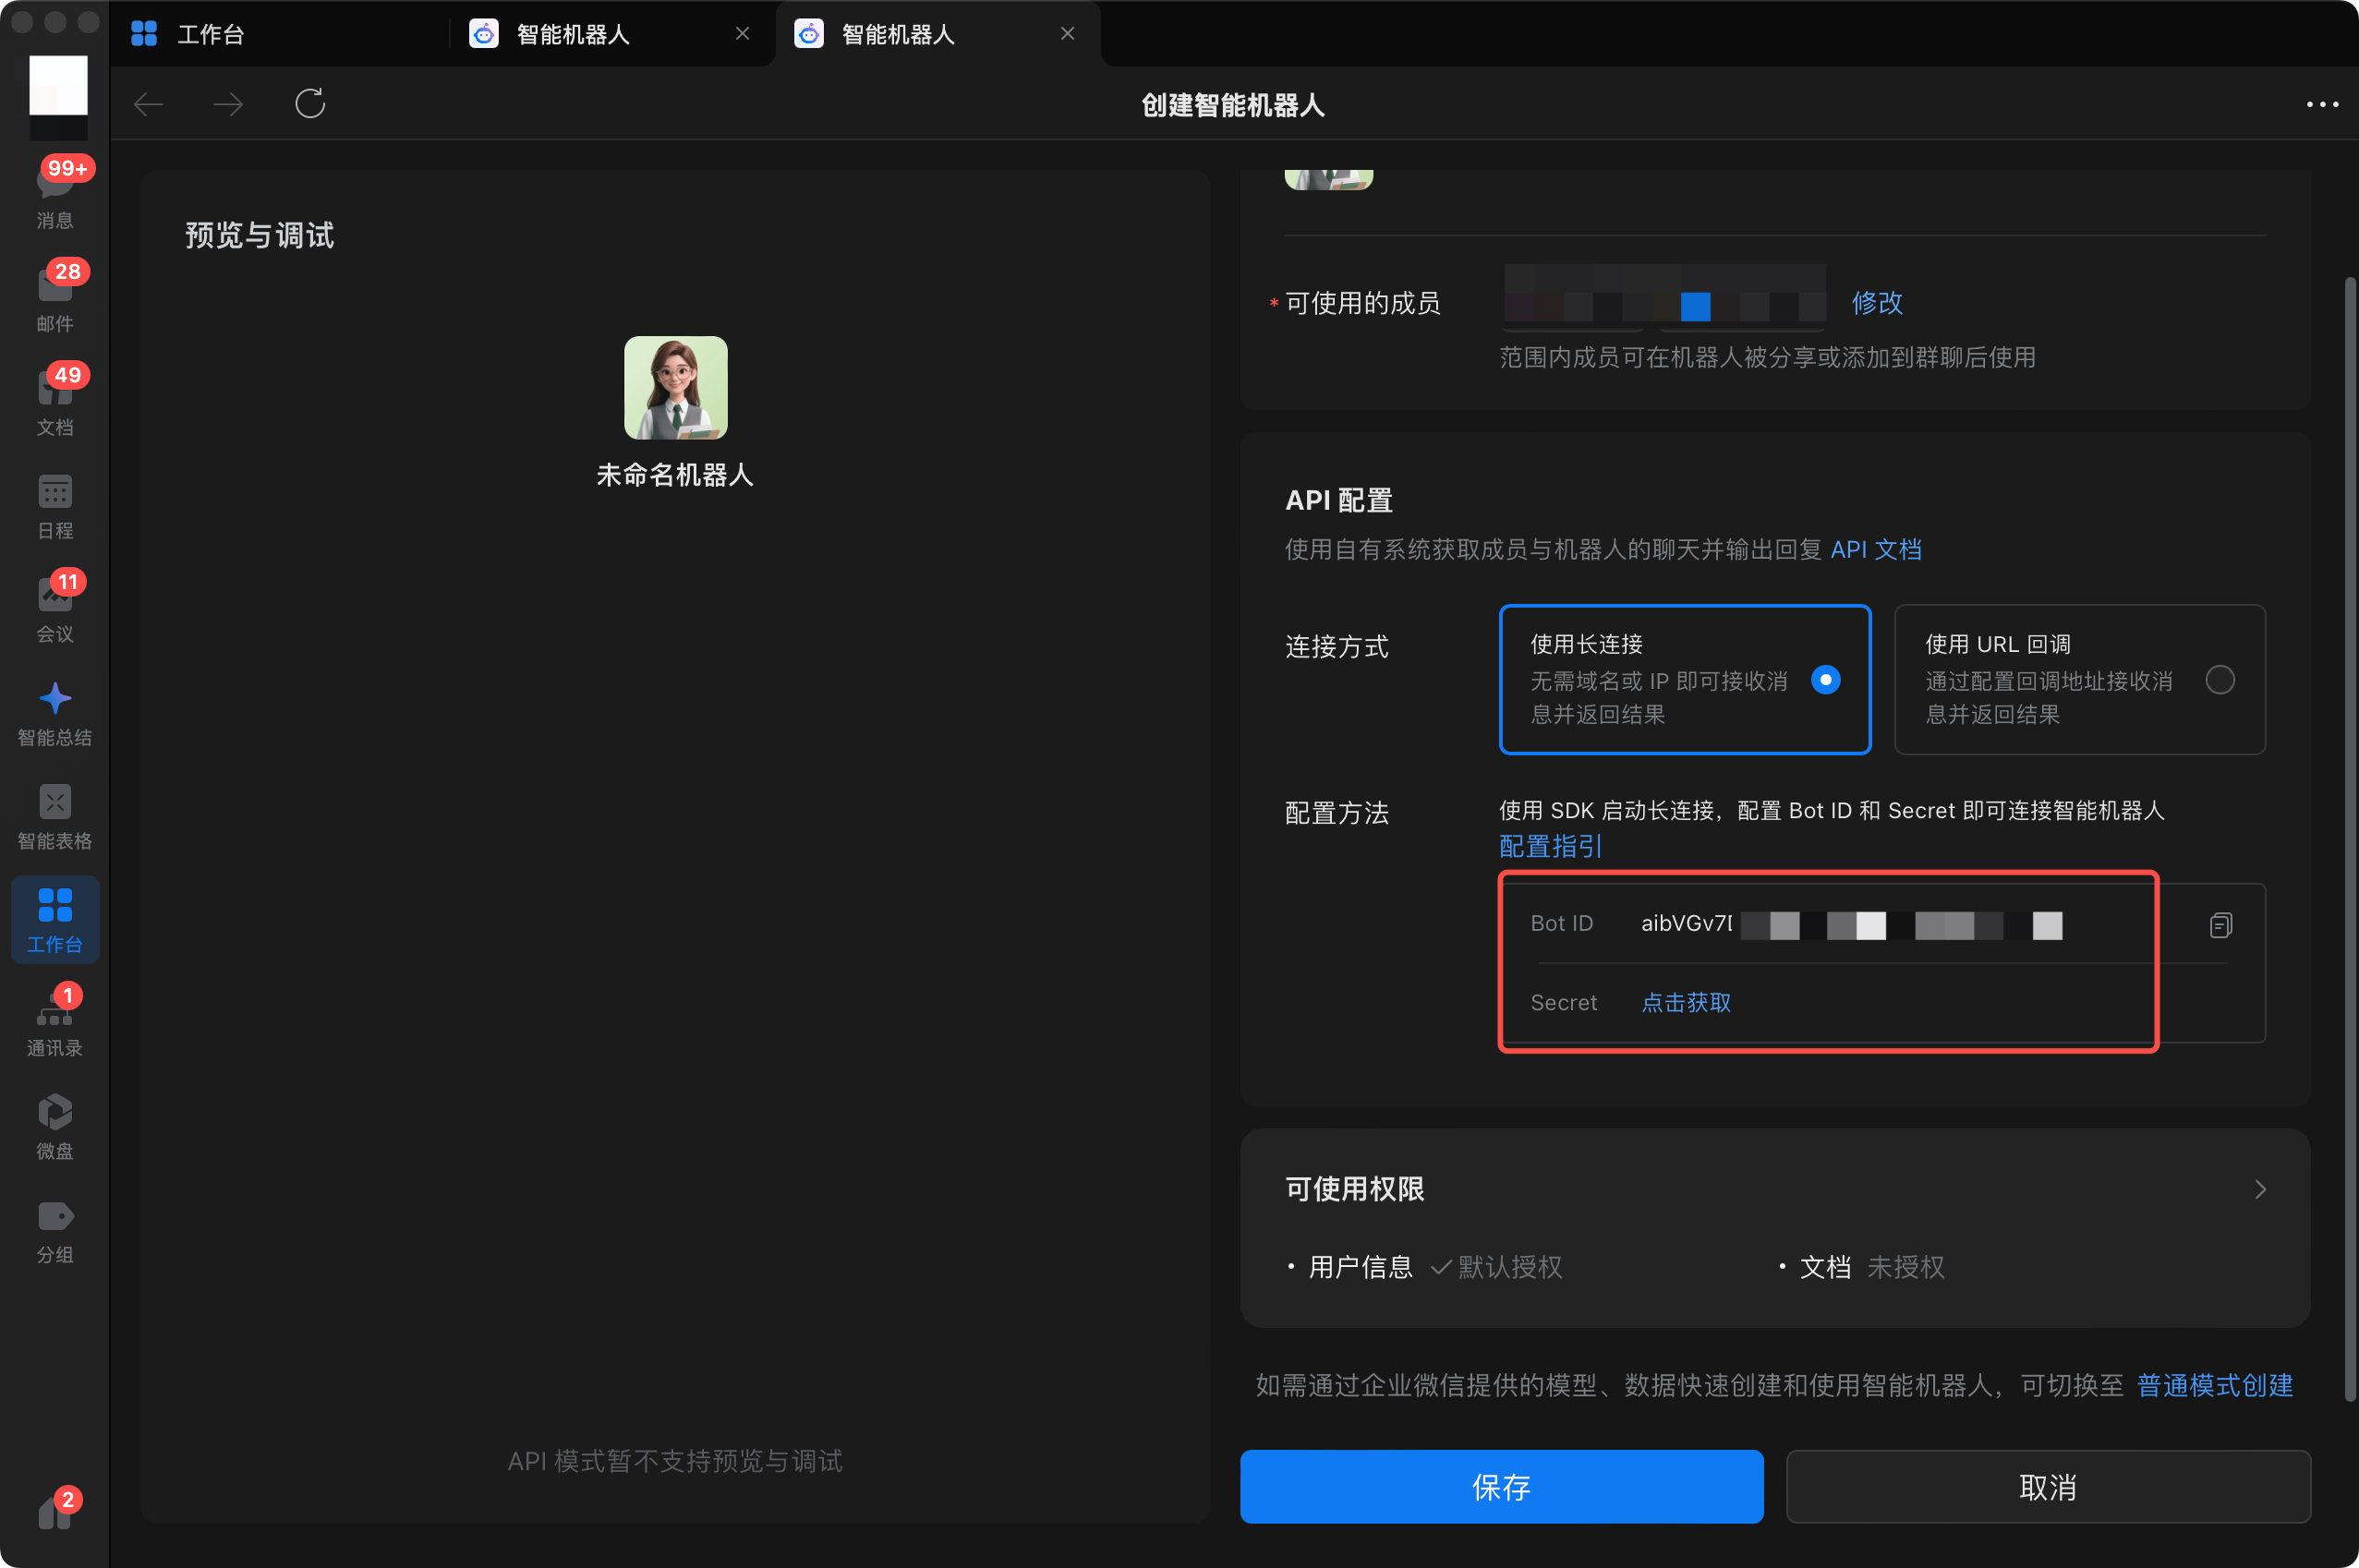
⚠️ Important: The Secret is displayed only once. If lost, you can regenerate it on the Bot details page.
1.6 Save the Bot
After confirming that the Bot ID and Secret have been recorded, click "Save" to complete creation.
2. Integration Methods
In /remote-control, we recommend selecting Add WeCom Bot → Scan QR, then scanning the code shown in the terminal or web page with WeChat Work. After scanning, the Bot ID / Secret is obtained automatically and the WebSocket connection is established.
You can also continue to enter the credentials manually (through environment variables or ~/.codebuddy/channels/wecom/instances.json):
2.1 Configure Environment Variables
Before starting CodeBuddy CLI, set the following environment variables:
bash
export CODEBUDDY_WECOM_BOT_ID="<your Bot ID>"
export CODEBUDDY_WECOM_BOT_SECRET="<your Bot Secret>"
Optional Configuration
| Environment Variable | Description | Default Value |
|---|---|---|
CODEBUDDY_WECOM_BOT_ID | AI Bot ID (required) | — |
CODEBUDDY_WECOM_BOT_SECRET | AI Bot Secret (required) | — |
CODEBUDDY_WECOM_BOT_WS_URL | WebSocket server address (used for private deployment) | wss://openws.work.weixin.qq.com |
CODEBUDDY_WECOM_STREAMING_DEFAULT | Global default streaming switch (1/0, or true/false) | Unset → On (same as the per-Bot default) |
CODEBUDDY_WECOM_CARDS_DEFAULT | Global default permission/suggestion card switch (1/0, or true/false) | Unset → On (same as the per-Bot default) |
Priority: Streaming/card settings explicitly configured for an individual Bot on its action page > the two global defaults above > the built-in default (on). When multiple Bots share the same global defaults, you only need to set them once instead of configuring each Bot individually.
Persistent Configuration (Optional)
Add environment variables to your shell startup file for automatic loading on each startup:
bash
# ~/.zshrc or ~/.bashrc
export CODEBUDDY_WECOM_BOT_ID="<your Bot ID>"
export CODEBUDDY_WECOM_BOT_SECRET="<your Bot Secret>"
3. Start CodeBuddy and Connect
3.1 Start Interactive Mode
bash
codebuddy3.2 Open Remote Control Panel
/remote-controlThis command opens an interactive panel listing all available connection clients.
3.3 Connect to wecom-bot
Use the arrow keys to select a WeCom entry, then press Enter to open the Bot's action page (connect / disconnect, streaming switch, and card switch):
Remote Control

  • WeCom  [disconnected · stream]
  • Add WeCom Bot
  • Add WeChat Account
  ✖ Cancel
If credentials have not been configured, a WeChat Work binding QR code is shown first. You can also choose to enter the Bot ID / Secret manually when adding the Bot. The panel closes automatically after a successful connection.
The default Bot started through the CODEBUDDY_WECOM_BOT_ID / CODEBUDDY_WECOM_BOT_SECRET environment variables can also open its action page to change these switches. The settings are written to ~/.codebuddy/channels/wecom/instances.json. This instance cannot be deleted from the panel.
3.4 Check Connection Status
Run /remote-control again to check the connection status. A WeCom entry includes its current mode, such as [connected · stream] or [connected · reply · text].
Status descriptions:
disconnected— Not connectedconnecting— Connecting, please waitconnected— Connectedstream/reply— Streaming on / off (when off, the entire response is pushed at once without tool progress updates)text— Card interactions are disabled; confirmations revert to replies usingy/nor an option number
The Web UI Remote Control page provides the same streaming and card switches.
4. Panel Operation Instructions
| Operation | Description |
|---|---|
↑ / ↓ | Select client entry |
j / k | Vim-style navigation (equivalent to up/down arrow keys) |
Enter | Open the WeCom action page (connection, streaming, and cards); directly connect or disconnect other default instances |
Esc | Return to the previous level or exit the panel |
5. Verify Integration
After establishing the connection, you can verify that the Bot is working properly through the following methods.
Method 1: Direct Conversation
- Open the WeChat Work client (desktop or mobile)
- Find the Bot you created in the message list
- Send a test message (such as "Hello") and confirm the Bot replies
Method 2: Group Chat
- Add the Bot to a group chat
- Send a message via @Bot name in the group
- The Bot will respond to @mentioned messages
6. Message Processing Flow and Status Indicators
Complete Message Processing Flow
The processing flow after a user sends a message to the Bot:
User sends a message in WeChat Work
        ↓ Real-time message push over a persistent WebSocket connection
CodeBuddy CLI receives the message
        ↓ Reply within 5 seconds (meets the WeChat Work callback timeout requirement)
Streaming on: Start a stream immediately (using the callback's req_id) and replace the current message bubble in full as content is generated
Streaming off: Push one complete reply after generation finishes, without tool progress updates or sub-agent activity indicators
        ↓
Permission / question / suggestion: A vertical poll card is used by default; when cards are disabled, revert to text confirmation
        ↓
Open a new message bubble for subsequent conclusions (streaming) or push another text message (non-streaming)
Streaming Reply Mechanism
WeChat Work streaming messages (aibot_respond_msg stream type) are used by default. You can disable streaming for the current Bot in /remote-control or the Web UI and switch back to pushing a complete WeComReply.
When streaming is enabled:
- Start immediately: Upon receiving a user message, immediately start a stream using the callback's
req_idto meet the 5-second reply requirement - In-place replacement: Subsequent frames with the same
stream.idcontain the full content and refresh the current message bubble - One message per segment: When a body segment ends, set
finish=true; the next segment uses a newstream.id, preventing the entire response from being crammed into a single message bubble - Tool status: Long-running tools and sub-agents use a separate status bar without exposing commands, file contents, or task prompts
- Interactive cards: Permission confirmations, questions, and next-step suggestions use vertical poll cards (
vote_interaction). The user selects an option and submits it, after which the card is disabled within 5 seconds according to the official protocol. If sending the card fails or cards are disabled, the original text replies (y/n/ option number) are used instead
Reference: AI Bot Persistent Connection Documentation ——
req_idassociates the same callback,stream.ididentifies a message bubble, andstream.contentreplaces its content in full.
User Experience
| Stage | Chat Window Display | Description |
|---|---|---|
| After sending a message (streaming on) | The reply starts to appear and updates as it is generated | The same message bubble is replaced in full rather than appended to |
| After sending a message (streaming off) | One reply appears after the entire response is complete | No tool progress updates or sub-agent activity indicators |
| When confirmation is required (cards on) | Vertical options + submit; permission cards include a command summary | Overlong commands are followed by another message containing the original text |
| When confirmation is required (cards off) | Plain text; reply with y / n or an option number | Same behavior as version 2.140.0 |
| End of a segment | The message bubble is finalized and the next segment opens a new one | Multiple segments within one response are displayed separately |
Timeout Handling
- Streaming Message Timeout: 6 minutes (timed from first stream send)
- Safety Timeout: 5 minutes (1 minute buffer reserved)
- Timeout Fallback: If Agent processing exceeds 5 minutes, automatically fallback to async push (
aibot_send_msg, 24-hour validity) - Callback Timeout: Must send reply within 5 seconds after receiving message callback (streaming placeholder message meets this requirement)
7. How It Works
WeChat Work user sends message
        ↓
WeChat Work server (WebSocket connection pool)
        ↓ WebSocket long polling real-time push
CodeBuddy CLI (WecomBotClient)
        ↓
CodeBuddy Agent processes message, generates reply
        ↓
Reply message via the same WebSocket connection
        ↓
WeChat Work user receives Bot reply
Key Features
- Connection Mode: WebSocket long polling (client actively connects, no public IP required)
- Authentication Mechanism: Send
aibot_subscribeframe on startup, carryingbot_id+secretfor authentication - Message Reception: WeChat Work server pushes user messages in real-time via
aibot_msg_callbackframe - Message Reply: Return Agent replies in streaming mode via
aibot_respond_msgframe - Heartbeat Keep-alive: Send
pingframe every 30 seconds to keep connection alive - Auto Reconnect: Automatically reconnect after connection drop with exponential backoff strategy, maximum delay 60 seconds
8. FAQ
Environment Variables Not Configured
Symptom: Error displayed after selecting wecom-bot in /remote-control panel
Error: WeChat Work AI Bot is not configured.
Missing environment variables: CODEBUDDY_WECOM_BOT_ID, CODEBUDDY_WECOM_BOT_SECRETSolution:
- Confirm that
CODEBUDDY_WECOM_BOT_IDandCODEBUDDY_WECOM_BOT_SECRETare set - Execute
echo $CODEBUDDY_WECOM_BOT_IDto verify environment variables are active - Restart CodeBuddy CLI
- Execute
/remote-controlagain to try connecting
Connection Failed
Possible Causes and Troubleshooting:
Incorrect Bot ID or Secret
- Confirm the values copied from WeChat Work admin console are exactly the same (note if there are trailing spaces)
- Confirm the AI Bot application status is normal and not disabled
Network Connection Issues
- Check if you can access
wss://openws.work.weixin.qq.com - For private deployment, confirm
CODEBUDDY_WECOM_BOT_WS_URLis set correctly - Test network connection in browser:
curl -v wss://openws.work.weixin.qq.com
- Check if you can access
CLI Log Viewing
- Check error logs in terminal output
- After executing
codebuddy, stay in the main interface and observe output during connection process
No Response After Connection
Troubleshooting Steps:
- Execute
/remote-controlto confirmwecom-botstatus isconnected - If status is
disconnected, reconnect - Check CLI terminal logs for error messages
- Confirm CodeBuddy CLI process is still running (not interrupted or exited)
CLI Restart Requires Reconnection
The /remote-control connection status is temporary and not persisted. After each CodeBuddy CLI restart, you need to execute /remote-control again and select wecom-bot to establish connection.
Auto-Connect Solution (if you need auto-connect on each startup):
Add the following to your startup script or shell configuration file:
bash
# ~/.zshrc or ~/.bashrc
export CODEBUDDY_WECOM_BOT_ID="<your Bot ID>"
export CODEBUDDY_WECOM_BOT_SECRET="<your Bot Secret>"

# Optional: Create alias for quick startup with auto-connect
alias cbc-wecom='codebuddy -c "/remote-control"'
The
-cparameter indicates automatically executing the specified command on startup.
App Shows "Token Expired" or "Invalid Secret"
This usually means the Bot's Secret has expired or been regenerated. Solution:
- Log into WeChat Work admin console and go to Bot details page
- Regenerate Secret in the "API Configuration" area
- Update the environment variable
CODEBUDDY_WECOM_BOT_SECRET - Restart CodeBuddy CLI and reconnect
Related Documentation
- Remote Control - Learn about all Remote Control features and other clients
- Slash Commands - Master all built-in commands
- Settings - Learn about CodeBuddy configuration options